
Add or edit a product
Everything about one product lives on one screen, the editor. This chapter shows how to add a product, what each part of the editor does, how the two settings that decide what customers see work together, and the jobs you will do most often.
In this chapter
Add a product
Press New product at the top of the Products list. The orange New button at the top of every screen has a Product choice that opens the same form. A new product asks for its first size and price on the same screen. You can add more sizes and photos once it is saved.
- Name it. Type the name the way customers say it, such as ShowTime 27/20. Choose the brand and the category, and write a summary.
- Describe it. The description can wait. Chapter 12, Descriptions, feed tags and Fetch with AI covers it, and the Feed tag for feed products.
- Give it a size and a price. In Size and price, type the amount (50), choose the unit (lb) and what it is sold as (bag). Then type the price. Chapter 11, Sizes, prices and photos covers cost, SKU, barcode and sales tax.
- Choose the first photo. Pick a JPEG, PNG or WebP file from the computer or phone.
- Decide whether it goes on the website. In Website, leave Status at For sale and Website at On the website to put it up at the next update, or change them to keep it private for now.
- Set up the stock. In Stock, leave Track stock on hand ticked and type how many are on the shelf and the reorder point. Untick it for something you do not count.
- Press Add product. Roadside says Product added. Add more sizes and photos here, or choose Done. and opens the editor for the new product.
A new product starts as For sale and On the website, with stock counting on and nothing on hand. At the next update the website lists it as Out of stock right now, and nobody can buy it until you give it some stock or turn counting off. If you are not ready, set Status to Draft before you press Add product.
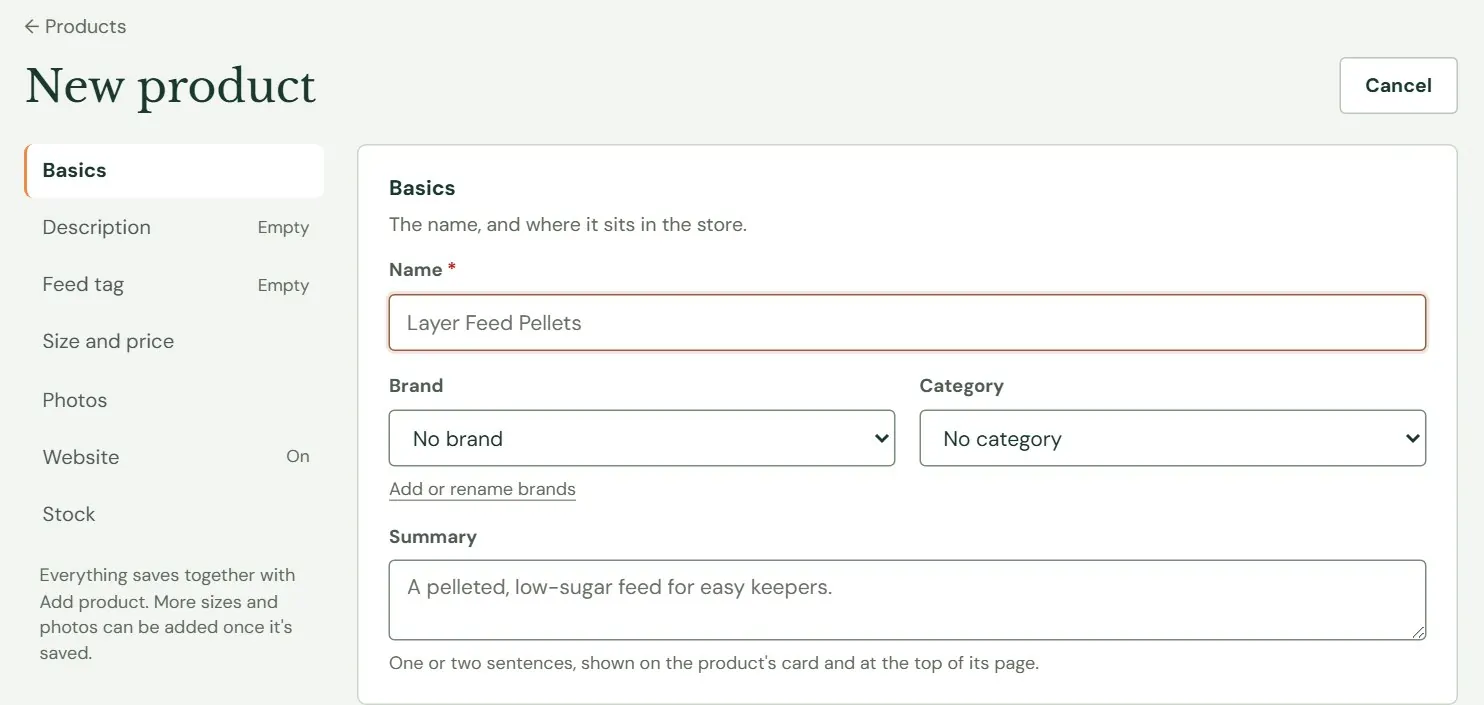 12345
12345- 1The sections of the form. A word beside a section says what is in it, or that it is empty.
- 2The name customers will see. This is the one required box in Basics.
- 3The maker. Press Add or rename brands to change your list.
- 4The category the product is filed in.
- 5One or two sentences for the product's card.
The editor, section by section
Open a product and press Edit to reach the same form with the product filled in. The heading follows the name as you type it. Under it sit three small badges: whether the product is on the website, how many sizes it has and how many photos. View on the website appears when the product is shown to customers. For a product you have just added it reads Publishing to your website… until its page is live, which takes a few minutes. Done leaves the editor.
The menu down the left side jumps to a section. Sections that other parts of Roadside add, such as Feed tag, sit in the same list.
| Section | What it holds | Covered in |
|---|---|---|
| Basics | Name, brand, category and summary. | This chapter |
| Description | The "About this product" text. | Chapter 12, Descriptions, feed tags and Fetch with AI |
| Feed tag | Guaranteed analysis, ingredients and feeding statement, for feed products. | Chapter 12, Descriptions, feed tags and Fetch with AI |
| Sizes and prices | Each size with its price, cost, SKU and barcode, and the sales tax class. | Chapter 11, Sizes, prices and photos |
| Photos | Up to five photos, the cover first. | Chapter 11, Sizes, prices and photos |
| Website | Status, Website setting, and how the product reads in a search result. | This chapter |
| Stock | Whether each size is counted, and its reorder point. | Chapter 13, Stock |
| Price Watch | Other stores' prices for the same item. Appears when your plan includes it. | Chapter 15, Compliance watch and Pricing check |
In Basics, the name can be up to 160 characters, and two products may share a name. The brand list is the one you keep under Inventory, Brands. The category list shows every category in one flat list: choose the most specific one, such as Poultry, because it decides which department page the product appears on. A product sits in one category.
A product's web address is made from its name on the day you add it. Renaming the product later does not change the address, so customers' bookmarks keep working.
Two ways of saving
This is the part of the editor that catches people. Most of the form waits for Save product. Sizes and Photos do not.
 123
123- 1Saves everything you have typed in the sections that wait.
- 2Leaves the editor. It does not save.
- 3Which sections have changes that are not saved.
Save product keeps your changes in Basics, Description, Feed tag, Website, Stock and Sales tax together. If Roadside refuses any one of them, it keeps none, and a red note under the heading says why. What you typed stays on the screen so you can fix it. After a good save the screen says Saved. and stays open.
Sizes and prices and Photos are lists. Every button in them saves the moment you press it (Save size, Add photo, Make the cover and the rest), and the page reloads to that card. Those two cards carry the tag Saved as you go. Sales tax is the exception: it sits at the bottom of Sizes and prices but waits for Save product.
If you have typed in another section and then press a button in Sizes or Photos, Roadside warns you first: Your changes in Basics aren't saved yet. Saving this now drops them. Go ahead? Press Cancel, press Save product, then go back to the button. If you try to leave the editor with unsaved changes, your browser asks whether to leave the site.
Roadside does not warn you when two people edit the same product at the same time. Whoever presses Save product last keeps their version. At a busy time, agree who is working on a product.
Website: what customers see
Two settings in the Website section decide whether customers see a product and whether they can buy it online. They are separate on purpose.
Status says where the product is in its life. Draft is not ready: it is not for sale and not on the website. For sale is the normal state. Discontinued means you are not reordering it. A discontinued product stays on the website while there is stock to sell, and drops off when the last one goes. If you do not count its stock, it stays until you change something. Archived is not on the list: you archive a product from its own page, as described at the end of this chapter.
Website says how the product appears. On the website shows it and, when your store takes orders online and a size is in stock, lets customers add it to the cart. In the store only shows it for information, with no Add to cart. Customers can read about it and call. Hidden keeps it off the website.
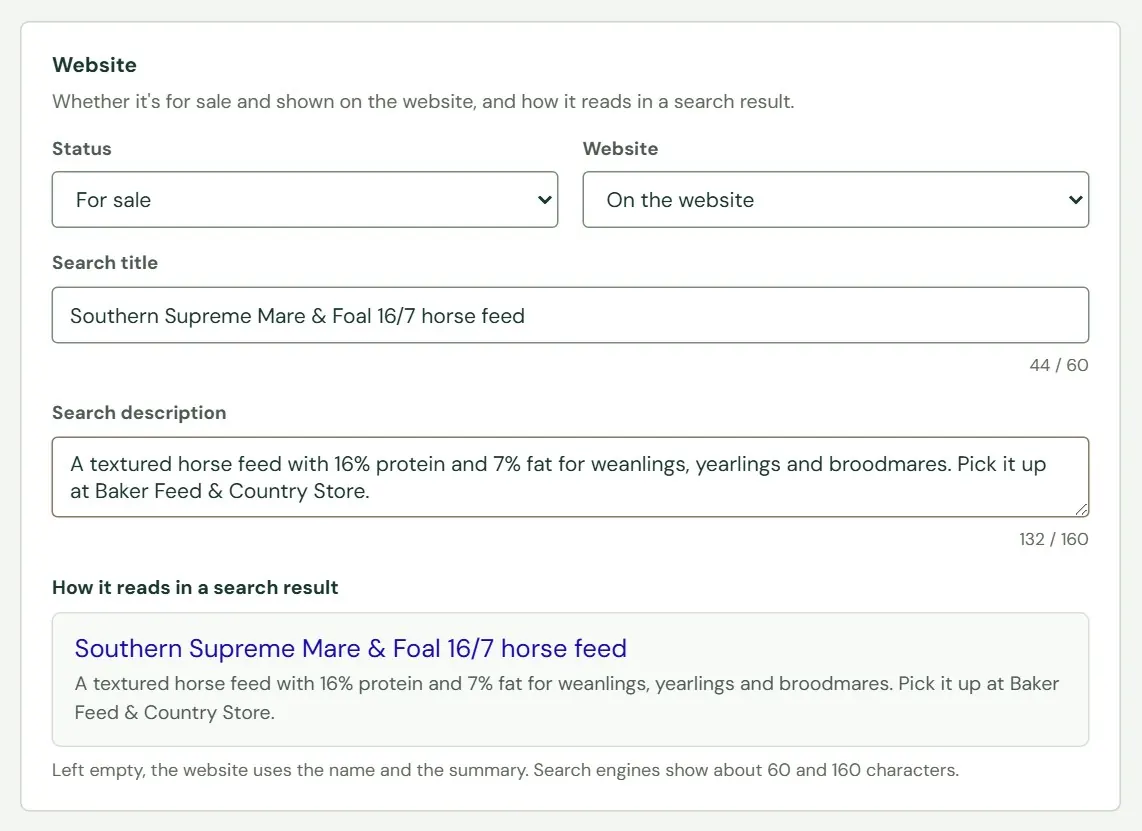 1234
1234- 1Draft, For sale or Discontinued.
- 2On the website, In the store only or Hidden.
- 3The headline in a search result. About 60 characters show.
- 4How the title and description will read.
The green On the website badge under the editor's heading means customers can see the product. It shows for In the store only products too. On the Products list, the Online column says Yes for the same products.
Search title and search description
These two boxes are for search engines such as Google. The title is the blue headline of a search result and the description is the grey text under it. Leave both empty and the website uses the product's name and its summary. Roadside counts characters beside each box. Search engines show about 60 characters of the title and about 160 of the description, and the rest is cut off. The preview underneath shows what you have typed.
Take a product off the website
| You want | Do this |
|---|---|
| To hide it for now and keep everything | Edit the product. In Website, set Website to Hidden (or Status to Draft). Press Save product. Set it back when you are ready. |
| To sell what is left, then drop it | Set Status to Discontinued and press Save product. It stays on the website while stock lasts and drops off when it runs out. This only works if you count its stock. |
| To retire it for good | Open the product page and press Archive. History stays, and you can restore it later. |
| To hide a whole department | Turn off Show in the online store on the category. The next section has the steps. |
The website changes at the next update, a few minutes after you save. Chapter 8, How your changes reach the website explains why. The product stays in your lists. Hidden and Draft products show No in the Online column, and so do Discontinued ones, even while they are still on the website.
Change a price, and run a sale
- Open the product and press Edit. Go to Sizes and prices.
- Press Change on the size's row. A small form opens with the size's price, cost, SKU and barcode.
- Type the new price in Price ($). Change Cost ($) too if what you pay has changed.
- Press Save size. Roadside says Size saved. This saves at once. You do not need Save product.
The product page's Price history card now shows the new price with the date and your name. The website picks up the change at the next update.
Roadside has no separate sale price. A sale is a lower price: change it when the sale starts and change it back when it ends. The website shows only the current price, with no crossed-out old one. Price history keeps each change with its date, so you can see what the regular price was. To change many prices at once, see Chapter 14, Importing and exporting products.
Hide a department
- Go to Inventory, Categories. Press the pencil on the department's row.
- Untick Show in the online store.
- Press Save. Roadside says Category saved.
At the next update the department's page, its card and every product filed directly in it leave the website. The products stay in Roadside. Tick the box again to bring them back.
Each category has its own switch. Turning off a department does not turn off the subcategories inside it, and products filed in a subcategory follow that subcategory's switch. To take Feed and everything in it off the website, open each subcategory too. The Online column on the Categories screen shows what is on and off.
Archive and restore
Roadside has no delete for products. Archive is how you retire one: it takes the product out of the lists and off the website and keeps its sales, stock and price history. Open the product page and press Archive. Roadside asks Archive this product? It will be hidden from lists and the online store. After you agree it says Product archived.
Archived products show on the Products list when you tick Archived. Open one and press Restore to bring it back. Restore asks nothing and says Product restored.
Restoring sets the product's Status to For sale, whatever it was before archiving. If you wanted it off the website, open Edit afterwards and set Website to Hidden or Status to Draft before the next update.
Staff do not see the Edit, New product or Archive buttons. A Manager sees everything described here.
Something here does not match your screen? Write to support@dirtroadsoftware.com with the name of the screen, what you pressed and what you expected. A picture of the screen helps.