
Articles
Articles are the news and tips on your website: Chick Days dates, what is in for fall, how to pick a horse feed. You write them in Roadside and they appear on your website a few minutes after you publish.
In this chapter
The article list
Articles appears in the menu when it is turned on for your store. If you do not see it, write to support@dirtroadsoftware.com. The Store owner and the Manager can do everything in this chapter. Staff can write articles and send them for review. Only the Store owner and Manager can publish, and only they see Categories, Authors and Settings.
The list shows every article, published or not. The heading is the name you give the section in Settings, which starts as Blog until you change it.
| Status | What it means |
|---|---|
| Published | Live on your website. |
| Scheduled | Has a date still to come. It goes live by itself. |
| Pending review | A person who cannot publish has sent it for you to read and publish. |
| Draft | Saved, but only your team can see it. |
| Trash | Taken off the website. Roadside keeps it for 30 days and then deletes it for good. |
Each row shows a thumbnail, the title, the tags, who posted it, the category and the date. A Pinned badge sits on an article you have pinned to the top of the website's Articles page. Press Title or Date to sort. The list shows 25 articles to a page.
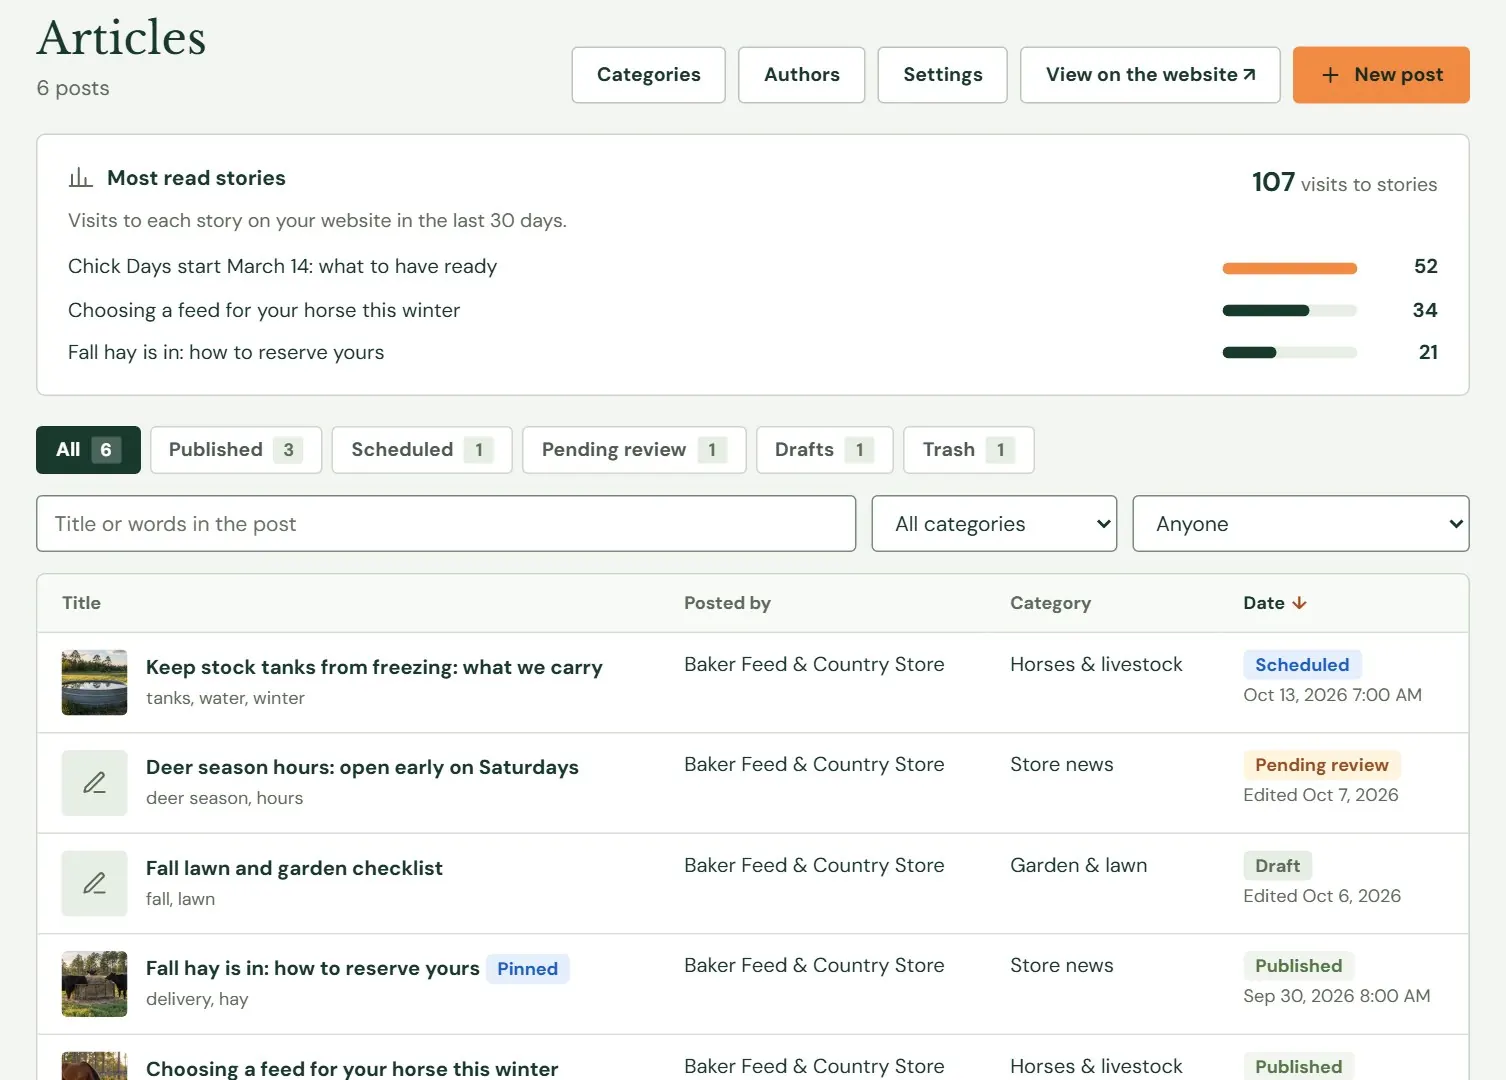 12345
12345- 1Categories, Authors and Settings, a link to your Articles page on the website, and the New post button.
- 2The articles people read most on your website in the last 30 days, with the number of visits to each.
- 3Filter by status. The number is how many articles have it.
- 4Search the title and the words in the post, or narrow by category and by who posted it.
- 5A blue Scheduled badge with the date and time it goes live.
Most read stories appears above the list when the website has had visits to articles. Its numbers come from Analytics, so they match the Pages tab in Chapter 23, Analytics.
Write and publish an article
- Press New post. You can also use the New button at the top of any screen, or Write a post on Website home.
- Type the title. It is required, up to 200 characters.
- Write in the Post box. Use the toolbar above it for headings, lists and links.
- Add a photo, a category and a summary if you like. The next sections show how.
- Press Publish. Roadside says Post published. and the article is on your website a few minutes later.
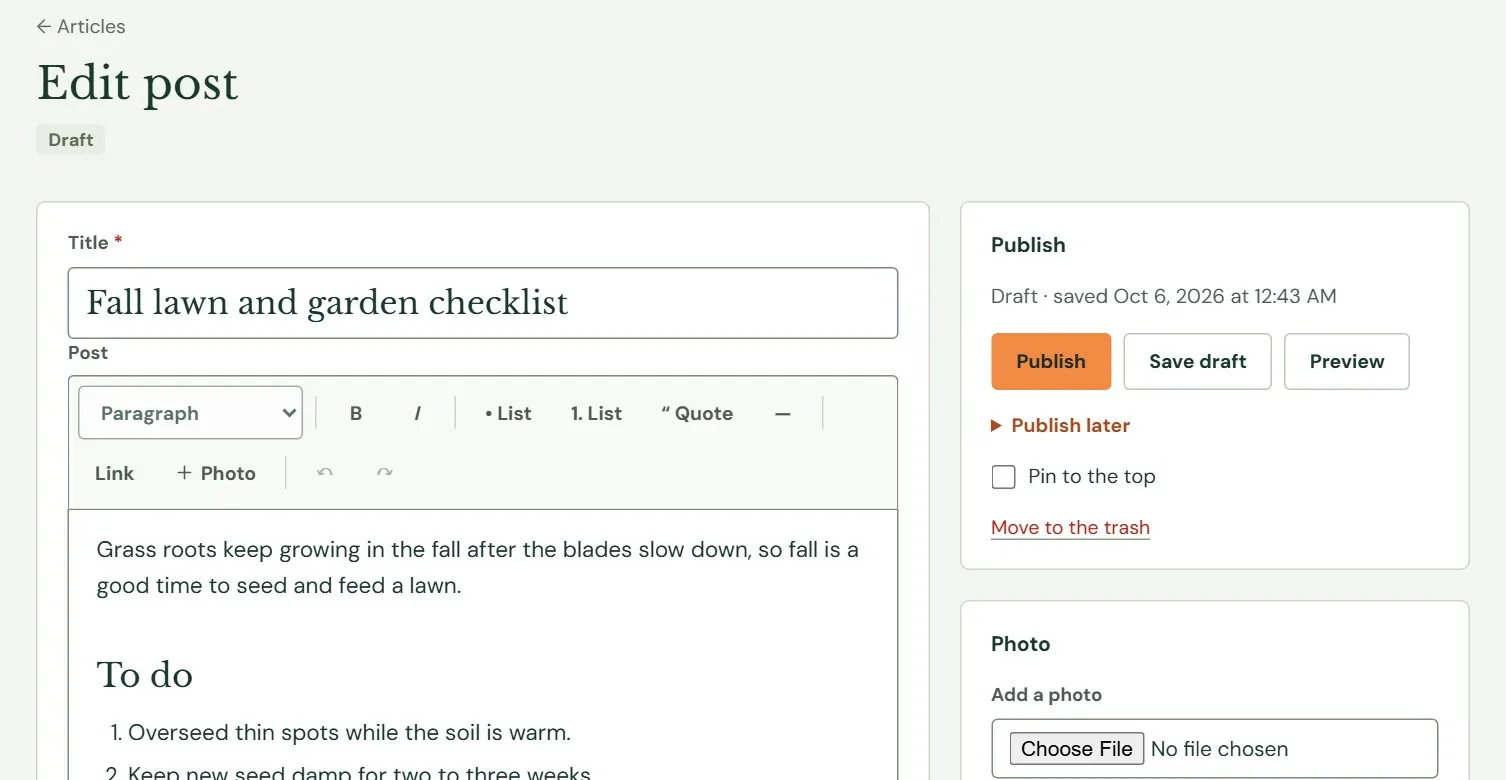 12345
12345- 1The title. It shows at the top of the article and in lists.
- 2Formatting buttons.
- 3The article itself.
- 4Publish, Save draft or Preview, and the Publish later fold-out.
- 5When the article was last saved.
You do not have to press Save as you write. Roadside saves a draft by itself every 30 seconds while something has changed, and when you switch to another tab. A new article becomes a draft on its first save and shows as Untitled post until it has a title. Press Save draft when you want to stop and come back, or Preview to open the article's address on your website.
Preview opens the address on your website, and the website shows only published articles. A draft's Preview can therefore say the page was not found until you publish. Read a draft in the editor instead.
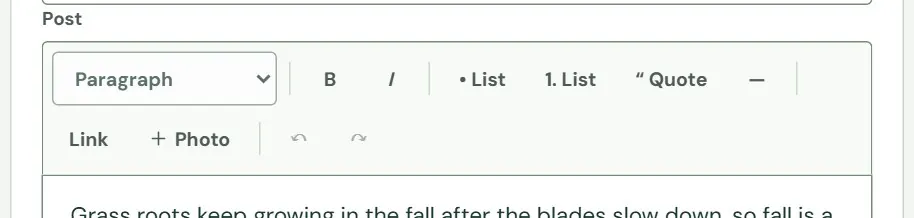 12345678
- 1Paragraph, Heading or Small heading, for the paragraph the cursor is in.
- 2Bold (Ctrl+B) and Italic (Ctrl+I).
- 3Bulleted list and numbered list.
- 4Quote.
- 5A dividing line after the paragraph you are in.
- 6Link (Ctrl+K). Type a web address or a page on your site such as
/shop. - 7Add a photo to the article.
- 8Undo and redo.
The box keeps to a short list of things, so every article looks like the rest of your website: paragraphs, two sizes of heading, lists, quotes, photos with a caption, dividing lines, bold, italic and links. There are no colors, fonts, tables or videos. Text you paste from Word, Google Docs or another website is cleaned down to those things, and pictures on other websites are left out. Enter at the end of a heading starts an ordinary paragraph. Shift+Enter makes a line break.
An article can have up to 400 paragraphs, headings, lists and photos. A longer one gets This post is too long. Split it into two posts.
Photos in an article
An article can show two kinds of photo. The featured photo goes at the top of the article, in lists and when someone shares it. Photos in the text go where you put them.
A photo in the text
- Click in the Post box after the paragraph where the photo belongs.
- Press + Photo in the toolbar. On the Upload tab, choose a picture from your computer or your phone's camera. It appears as a preview when it has uploaded.
- Describe the photo in one short sentence, or tick It's only decoration, so it needs no description.
- Add a caption if you want one. It shows under the photo.
- Press Add to the post.
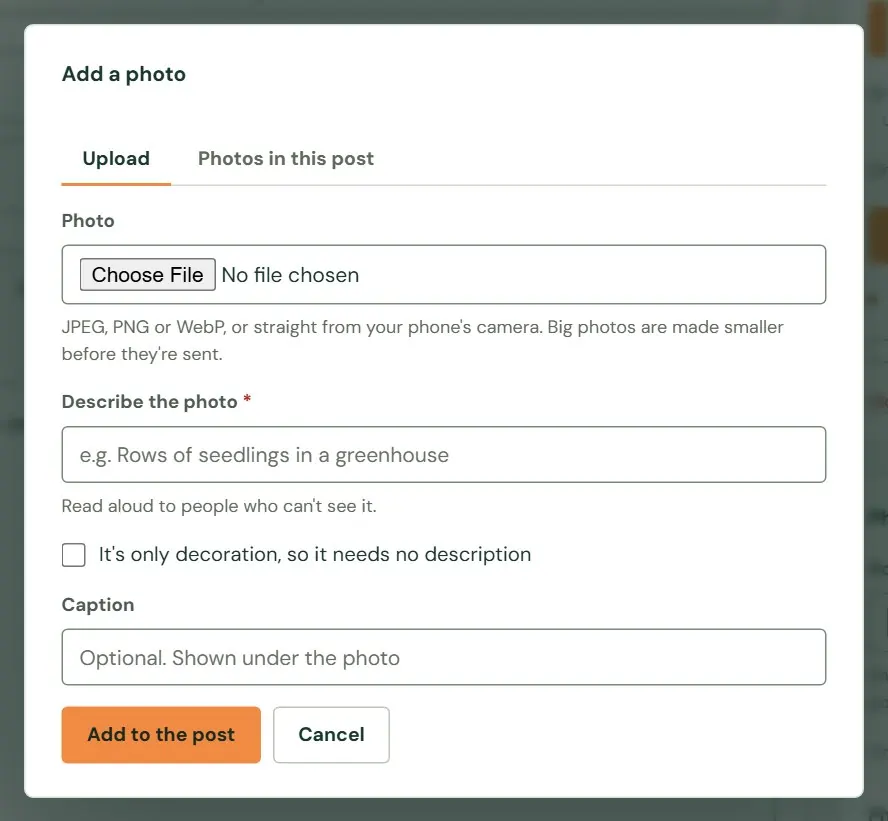 12345
12345- 1Upload a new photo, or pick one already used in this article.
- 2What the photo shows. Up to 200 characters.
- 3For a picture that adds nothing a person would miss.
- 4Optional. Up to 300 characters.
- 5Puts the photo into the article.
- Photo description
- A sentence saying what the photo shows. People who use a screen reader hear it, and it shows when a photo does not load. Search engines read it too.
Roadside takes JPEG, PNG and WebP photos. Your browser shrinks a big photo before it uploads it, and Roadside removes hidden camera information such as the place where it was taken. A photo over 6 MB gets That photo is larger than 6 MB. A photo that cannot be read gets a message that tells you to save it again as a JPEG or PNG and try once more. Dragging a picture file onto the Post box opens the same box.
The featured photo
Use the Photo card in the right-hand column. Press Choose File and pick a picture. Wide photos work best. Type a Photo description, which becomes required once you choose a photo. The link under the file box, use a photo from this post, reuses a photo already in the text. Tick Remove this photo to take it off.
The featured photo is sent when you press Publish, Update or Save draft. The automatic save does not send it, so press a save button after you choose one.
Category, tags, author and summary
The right-hand column holds the details that go with the words. Together they decide how the article is listed, found and shared.
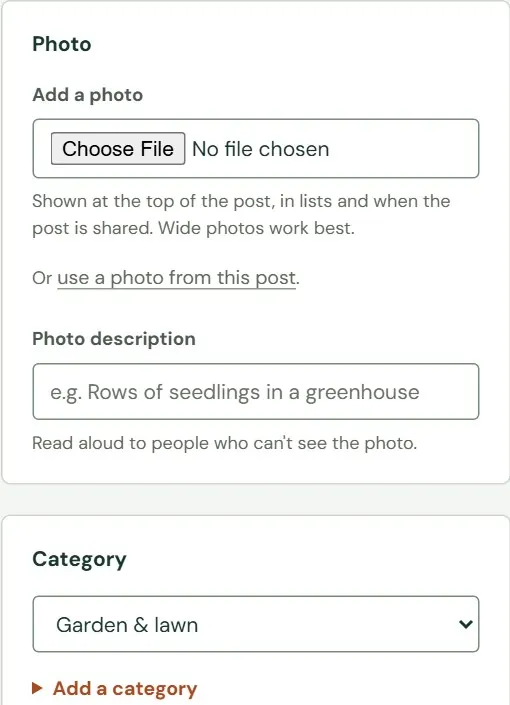 1234
1234- 1The featured photo.
- 2Required once there is a photo.
- 3One category for each article.
- 4Make a new category right here.
- Category
- One of the few big topics your articles cover, such as Poultry or Horses & livestock. Each article has one.
- Tag
- A detail about the article, such as chick days or winter. An article can have several. Roadside adds new tags for you as you type them.
Tags goes just above Posted by, which lists the names you set up on the Authors screen. Each article shows the store's name unless you pick another, so no employee's sign-in name reaches the website by itself. Summary is a sentence or two for lists. Leave it blank and Roadside uses the start of the article.
The Search engines and sharing box is closed until you open it. Web address is the last part of the article's address. Leave it blank and Roadside makes it from the title, with lowercase letters, numbers and dashes. On a published article, changing it keeps the old address working. Search engine title and Search engine description are what Google and Bing show for the article. Blank, they use the title and the summary.
Schedule an article, take it down, or trash it
Fold out Publish later in the Publish card and choose a Date and Time. The time is your store's own, shown under the boxes. The Publish button now says Schedule. Press it and Roadside says Post scheduled. It goes live and the date. The article goes live by itself within about a minute of that time, and reaches the website a few minutes after that.
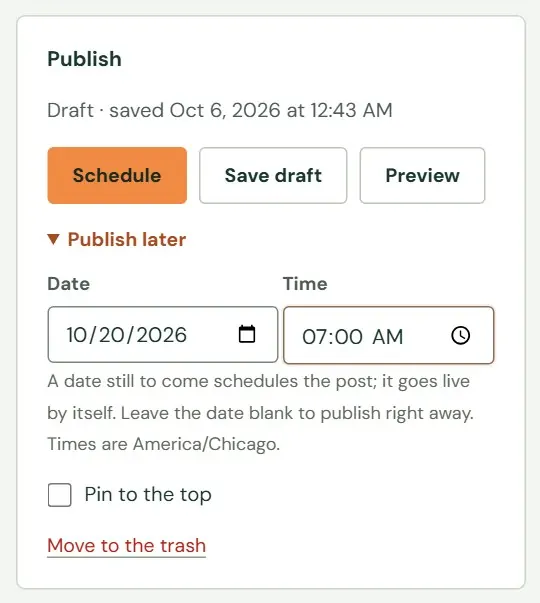 12345
12345- 1Fold this open to set a date.
- 2The day it should go live.
- 3The time, in your store's time zone.
- 4The button now says Schedule.
- 5The article's state.
A date in the past backdates the article: it goes live now and shows that earlier date. Leave the date blank to publish right away. On a published article the button reads Update, and Change the date replaces Publish later.
If you change a live article's date to one still ahead and press Update, the article comes off your website until that date. The message Post scheduled. It goes live is the only warning.
The same card has the other controls. Pin to the top keeps an article first on your Articles page, whatever its date. Take down (back to draft) removes a published article from the website and keeps it as a draft only your team can see. Move to the trash takes it off the website as well, and keeps it 30 days. Open a trashed article and press Restore from the trash to bring it back. Delete for good, on a trashed article, cannot be undone.
Review before publishing
A person with the Staff role sees Send for review and Save draft instead of Publish. The article waits under Pending review until a Store owner or Manager reads it and publishes it. Staff can change only their own articles that are not published yet.
If two people open the same article and one saves first, the other sees Someone else saved this post while you were editing it. Copy your changes, reload the page and make them again. A live article is never changed by the automatic save. Your unsaved words are kept aside and offered back with Bring them back the next time you open it, and you press Update to put them live.
Earlier versions and restore
Each time the title, summary or words of an article change, Roadside keeps the version it replaced. The last 25 are kept. Open the article and press the button in the top right that says how many earlier versions there are.
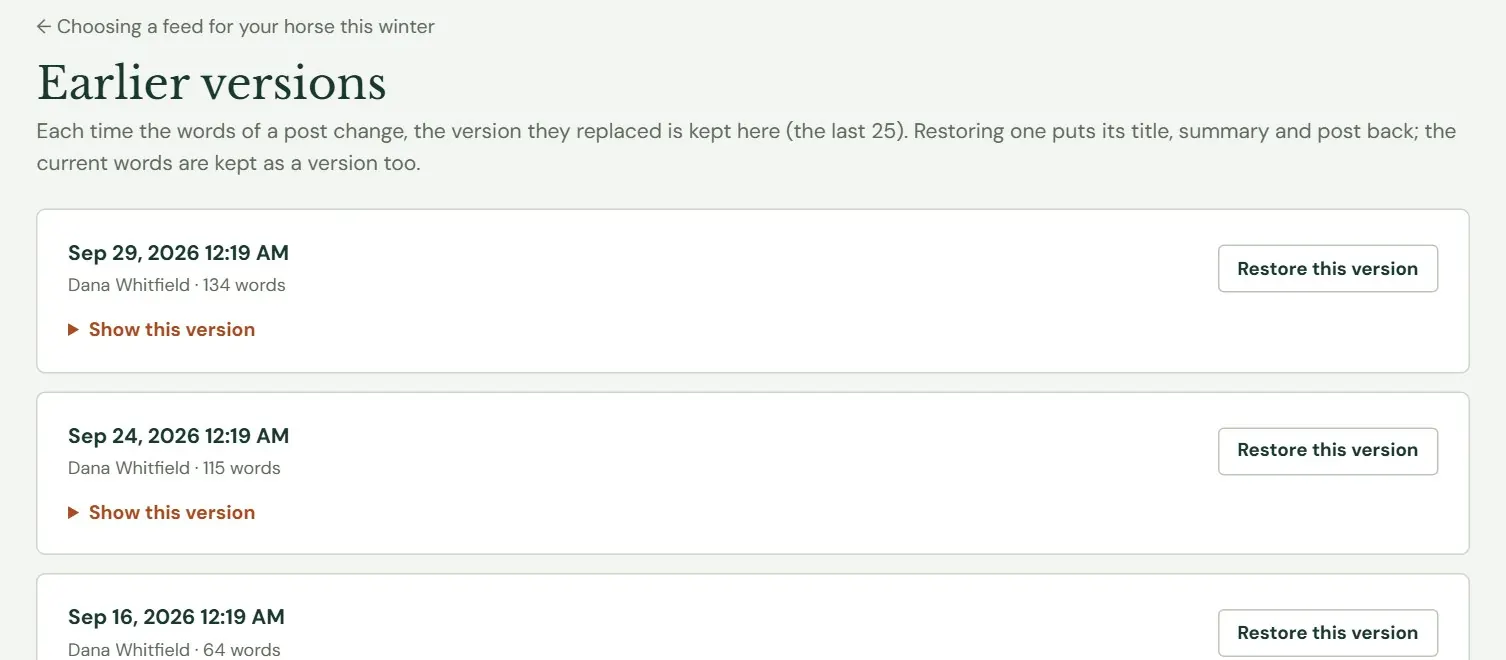 123
123- 1One card for each saved version, with its date, who saved it and how many words it had.
- 2Brings that version's title, summary and words back.
- 3Opens the old words so you can read them first.
- Press Show this version on a card to read it.
- Press Restore this version on the one you want, and confirm. The current words are kept as a version too, so nothing is lost.
- You are back in the editor with those words.
Restoring an earlier version on a live article changes the live article at once. Restore brings back the title, summary and words only. The category, tags, date, photo and web address stay as they are.
Categories and tags
Press Categories at the top of the article list. The left card lists your categories with their order and how many articles each has. The right card adds a new one. Under them, a Tags table lists every tag with its article count and a Rename or delete link.
A category's Order is a number from 0 to 9999. Lower numbers come first. Its Description, up to 1,000 characters, shows at the top of the category's page. Deleting a category leaves its articles in place without a category. Deleting a tag takes it off its articles. Each category gets its own page on your website.
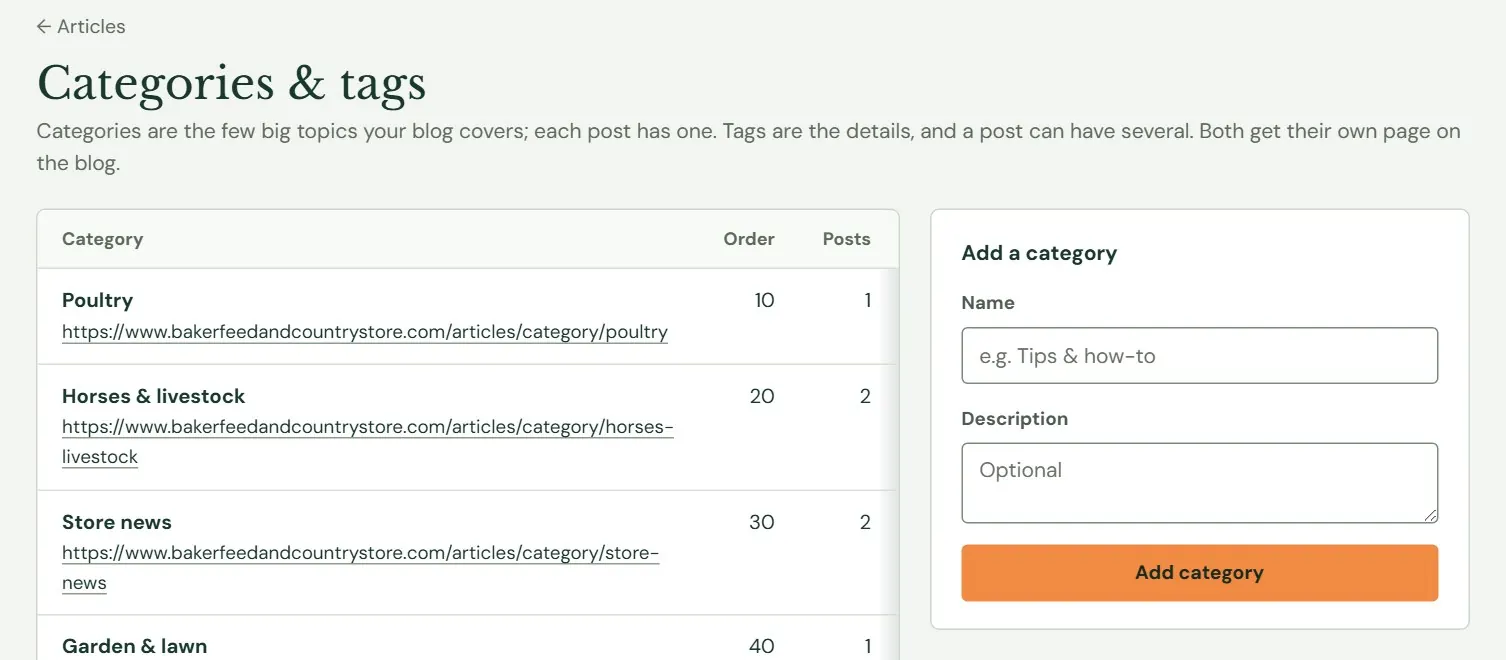 123
123- 1Each category with its order number, article count and its address on your website.
- 2Name and an optional description.
- 3Change a category's name, order or description, or delete it.
Authors
Authors are the names an article can be Posted by. Roadside makes one from your business name and uses it unless an article names someone else. You might add the family name, or the person who writes the Chick Days posts. The left card lists each name with how many articles show it, and a Default badge on the one used when an article picks none. Make the default moves the badge, Change opens a name to edit, and the trash icon removes it. The default cannot be removed until another name is the default. The right card, Add a name, takes the name posts show, an optional photo (a face or the storefront, square works best, JPEG, PNG or WebP up to 6 MB) and an optional line about them. A removed name leaves its articles showing the default.
Settings
Your website's design decides how articles look. Settings holds the choices it leaves to you.
The Settings screen has two cards. The section holds the Name of the page that lists your articles (and its name in menus, breadcrumbs and the feed), an Introduction of a line or two under it, and the Description for search results. Each post shows holds three ticks, Who posted it, The date it was posted and How long it takes to read, plus how many More posts under each post to offer (None, 3 or 6). Press Save and the website shows the change within a few minutes. Leave Name blank and the page is headed Blog. Description for search results is about 150 characters, and if you leave it blank Roadside uses the introduction. Posts in the RSS feed sets how many recent articles go into your articles feed, a file that readers and apps use to follow a site. The address of your Articles page, /articles, has no setting.
How soon an article reaches the website
Publishing, updating, taking down, trashing or restoring a live article, pinning, and changing categories, tags, authors or Settings all tell the website to update. About a minute later Roadside rebuilds the pages the change touches and sends them to the website. A burst of edits makes one update. Expect the change on your website a few minutes after you press the button, and see Chapter 8, How your changes reach the website for how updates reach it.
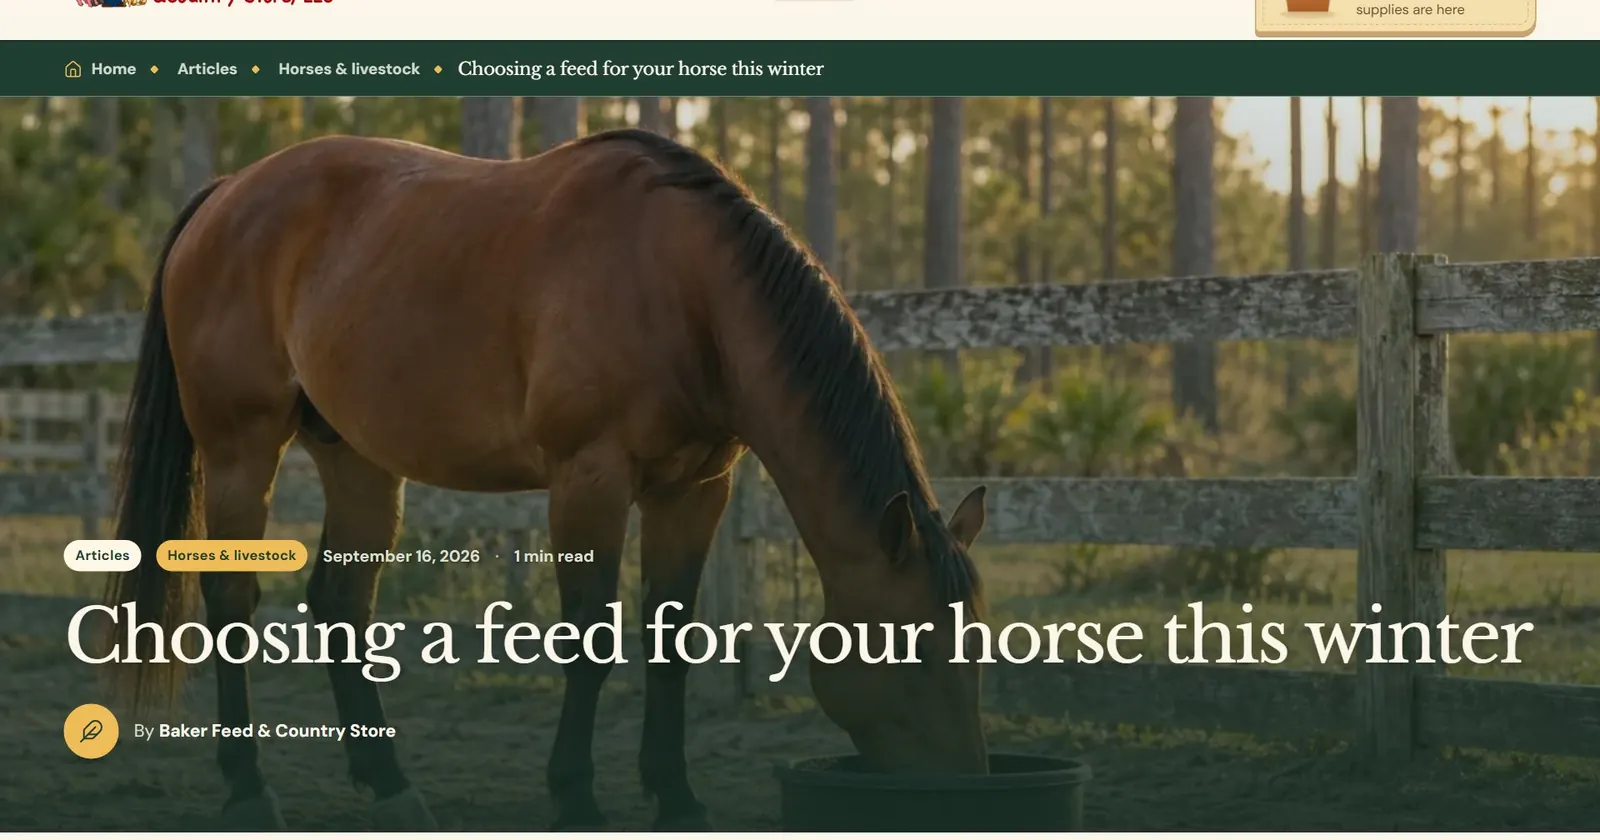 123
123- 1The category, which has a page of its own. The date and reading time sit beside it.
- 2The title.
- 3The Posted by name.
SEO articles
This appears when your plan includes the SEO Articles add-on. On a schedule set by the add-on, Roadside picks something people near you search for, writes an article about it from your own products, prices and hours, adds a photo, and publishes it on your website. The plan is one article a month, one a week, or two a week. Articles come out in the first hour after 7:00 a.m. store time, on the first weekday of the month, on Tuesdays, or on Tuesdays and Fridays. The screen shows the exact day and time of the next one.
SEO articles publish without asking you first. When one goes out, Roadside emails the store's owners at once with a link to the article, so you can change it. The only brake before an article is written is the Pause SEO articles tick. After it is written, you edit, take down or trash it in Articles like any other.
Under the plan, Topics waiting lists search phrases. The first carries a Next badge. Press Write it next on another to move it up, or Set aside to drop one. Recent articles lists what happened at each scheduled time, with a status: Published, Skipped, Didn't work, Writing, or Saved as a draft.
The What the articles cover card is yours to fill in. Towns you serve lists the only towns an article may mention. Delivery, in a sentence is how you say it, for example the radius you deliver. Topics to avoid takes one subject per line. Google Search Console property is optional. Search Console is a free Google tool that shows what people searched to reach your site. With it connected, topics include searches your website already shows up for. Tick Pause SEO articles to stop all writing until you untick it, then press Save.
An article never goes out without its photo. If the photo does not come, the article is saved as a draft with a note, as in the picture, and the owners get an email saying it needs a photo. Add one in Articles and publish it. Articles reach your website a few minutes after they go live, as described above. Anything in an article that you want changed, such as the voice it is written in, is something to ask Dirt Road for at support@dirtroadsoftware.com.
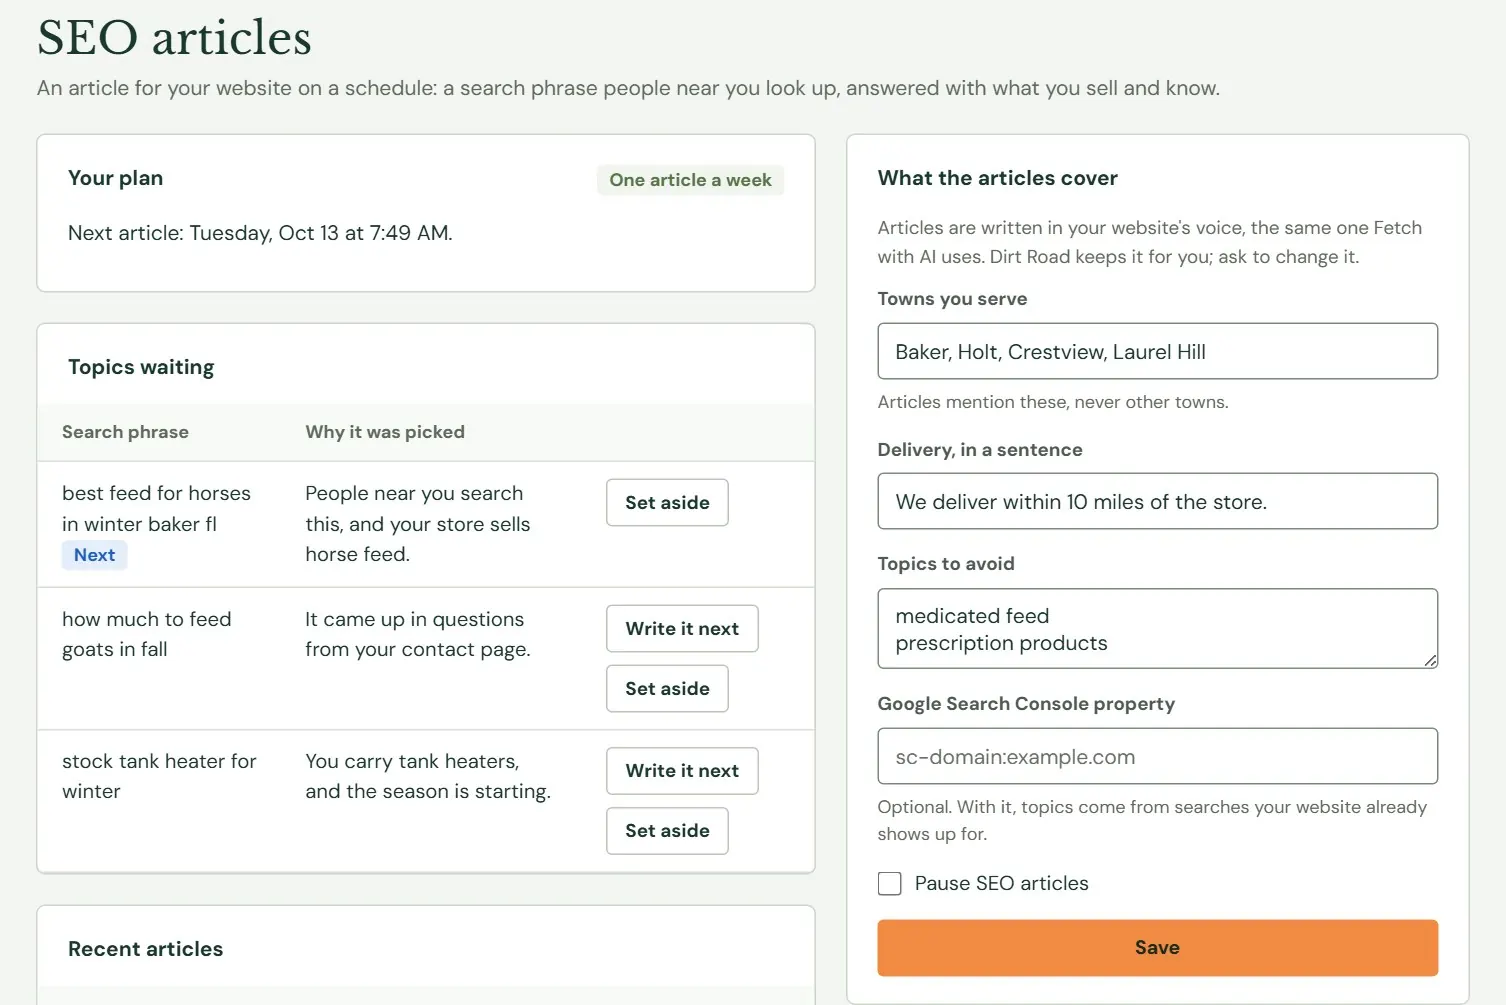 12345
12345- 1Your plan, and when the next article is due.
- 2Search phrases waiting to be written about, with why each was picked.
- 3The first topic is written next.
- 4What you tell Roadside about the store.
- 5Tick to stop all writing until you untick it.
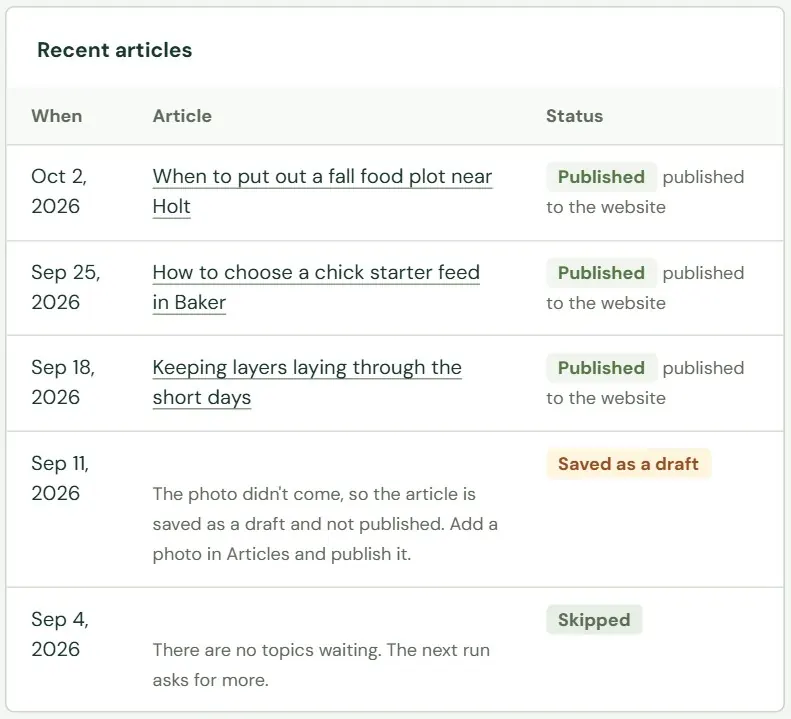 1234
1234- 1An article that was written. Press the title to open it in Articles.
- 2Published, with a note that it reached the website.
- 3The article was written but not published.
- 4Why. Here the photo did not come, so the article waits as a draft.
Something here does not match your screen? Write to support@dirtroadsoftware.com with the name of the screen, what you pressed and what you expected. A picture of the screen helps.