Sizes, prices and photos
A size is one way a product is sold, and the size carries the price. Photos belong to the product as a whole. This chapter covers adding a second bag size, every price and code field, the sales tax class, and the five photos a product can have.
In this chapter
How a product, its sizes and its photos fit together
A product is the thing on the shelf that customers ask for by name. It has a name, a summary, a description and a spot in your departments. A product always has at least one size. A product sold only one way has a single size, and customers never see a choice. A product sold two ways, such as a 50 lb bag and a 20 lb bag, has two sizes, and the website asks the customer which one.
Change a size's price, cost and codes
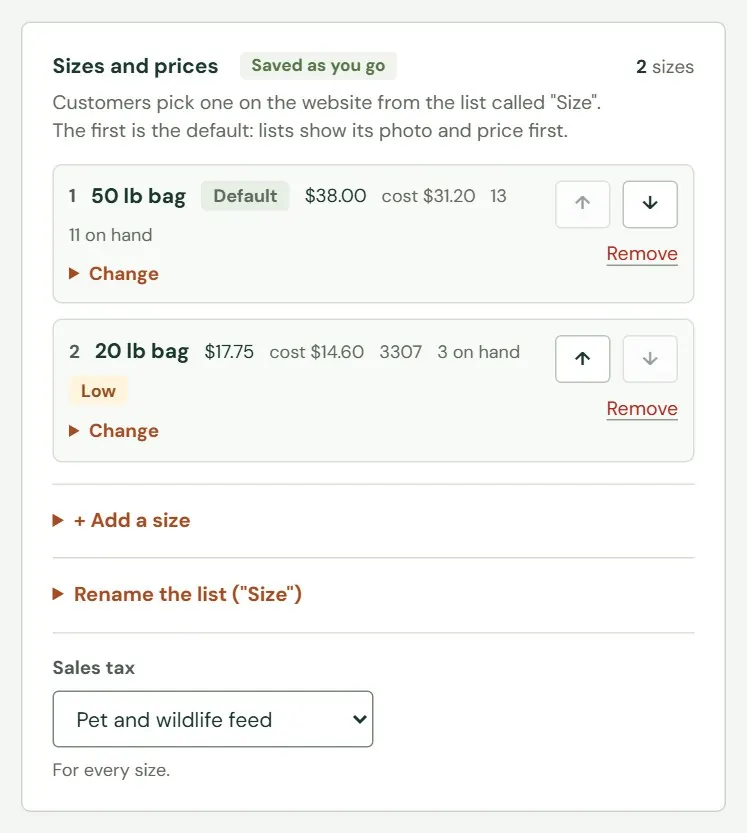
The Store owner and Managers can change sizes, prices and photos. Staff can look at them but see no Edit button. Open a product and press Edit, then go to Sizes and prices. Each size is one row with its name, price, cost, SKU and count, and a Low badge when the count is at or under its reorder point. Each row saves on its own.
 12345
12345- 1The first size is the default. Lists and cards show its price and photo first.
- 2Opens the form to change this size.
- 3Move the size up or down, or remove it. These show once a product has more than one size.
- 4Opens the form to add another size.
- 5The sales tax class, for every size.
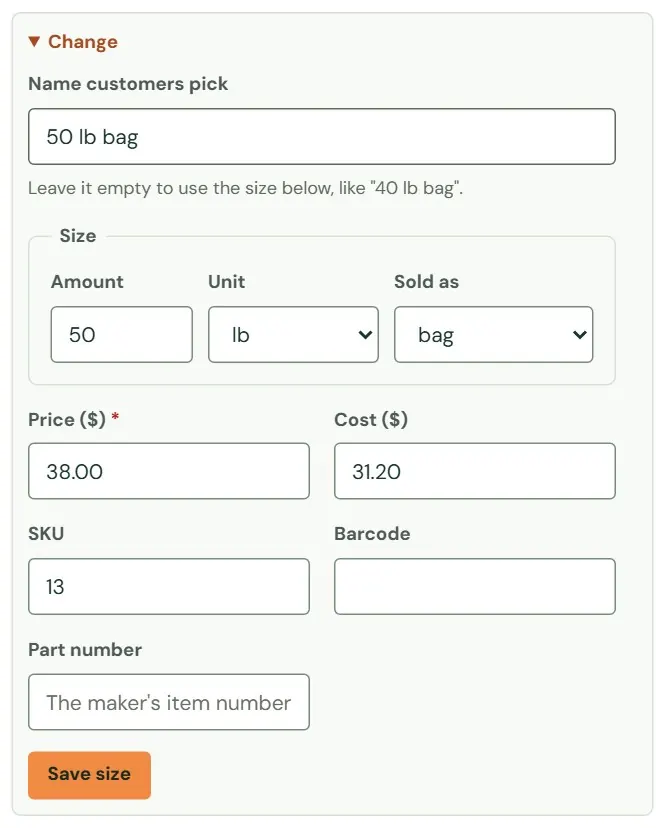
Press Change and the form opens under the row. Press Save size and Roadside says Size saved. Nothing in this form waits for Save product.
- Cost
- What you pay for the size. Customers never see it.
- Margin
- What is left of the price after the cost, as a percent of the price. A $14.50 bag that costs $10.40 has a 28% margin. The product page shows it once you have entered a cost.
 123456
- 1What customers pick on the website. This box appears once a product has two sizes.
- 2Amount, unit and what it is sold as. Together they make the size text, like 50 lb bag.
- 3The price customers pay. Required.
- 4What you pay. Optional.
- 5Your item number. Leave it as it is, or type another.
- 6Saves this size at once.
The Size boxes build the size text. Type an amount, choose a unit and choose what it is sold as, and you get 50 lb bag, 1 gal jug or each. Units run from lb, oz, tons, kg and g, through gal, qt, pt, fl oz, L, mL, cc and cu ft, to ft, in, yd and ct for a count. Sold as offers each, bag, bale, bucket, jug, tub, case and more. If you type an amount, choose a unit too. Price ($) is required. Type it like 22.50. A dollar sign and commas are fine, and 0 is allowed for something you do not sell. If Roadside cannot read it, it says Price must be an amount like 22.50.
Every change to price or cost goes into Price history on the product page, with the date and your name. The website shows a new price at the next update, a few minutes after you save.
Add a second size
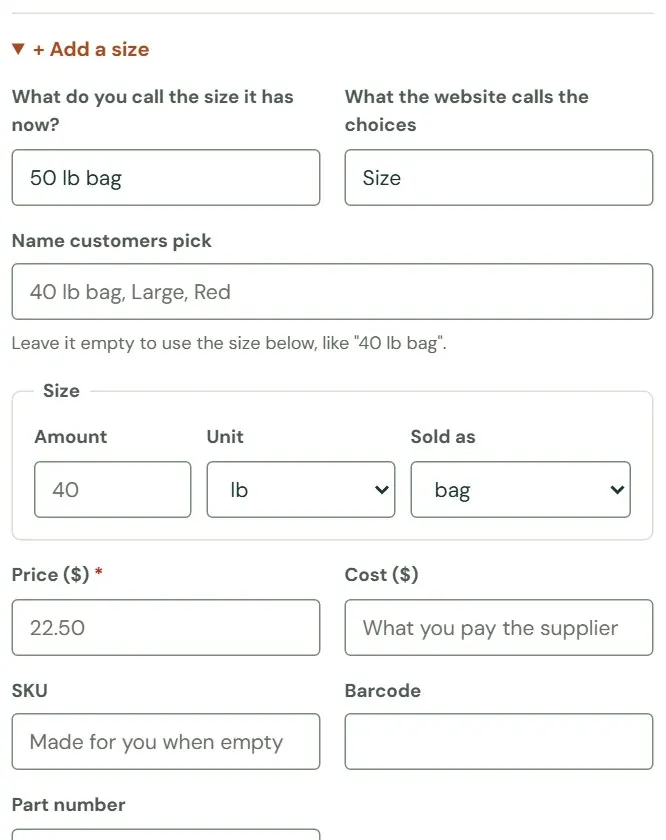
This is how to add a 25 lb bag to 16% Layer Pellets, which is set up with one size. The steps are the same for any second size on any product.
 1234
1234- 1First time only: what to call the size the product has now.
- 2First time only: what the website calls the choice. Size, Color or Scent.
- 3The new size's name, as customers will pick it.
- 4The new size's price. Cost, SKU, barcode and part number come after it.
- Open the product, press Edit and go to Sizes and prices. Press + Add a size.
- Name the size the product has now, if Roadside asks. Type 50 lb bag in What do you call the size it has now? Leave What the website calls the choices as Size, or type Color or Scent if that is what customers choose between.
- Name the new size. Type 25 lb bag in Name customers pick. If you leave it empty, Roadside builds the name from the amount, unit and package below it.
- Fill in the price. Cost, SKU, barcode and part number are optional. An empty SKU gets one made for you.
- Set the stock. Track stock on hand is ticked. Type how many you have in On hand now and the Reorder point, or untick it. Chapter 13, Stock covers both.
- Press Add size. Roadside says Size added. The product page on the website now shows a Size choice, and cards show From and the lowest price when the sizes cost different amounts.
Roadside will not add a second size with the same name as one the product already has. It says This product already has a size called "25 lb bag".
The arrows beside a row move that size up or down, and the first size is the default. Remove asks Remove this size? Its sales and stock history are kept. A product must keep at least one size: removing the last one is refused, and Roadside suggests archiving the product instead. Add a removed size back later under the same name and its history comes back with it. Rename the list, under the sizes, changes what the website calls the choices.
A few products came from a manufacturer file with two lists of choices, such as size and color. For those, the card says so. You can still change each size's price and details, but adding or renaming the choices is a job for Dirt Road. Write to support@dirtroadsoftware.com with the product's name.
SKU, barcode and part number
The three codes sit on each size, and none of them is required.
- SKU
- Your own item number for the size. It must be different for every size in the store.
- Barcode
- The 8, 12, 13 or 14 digits printed under the bars on the bag. Some call it the UPC.
- Part number
- The maker's own item number for the product, which is not the same as your SKU.
| Field | Rules |
|---|---|
| SKU | Roadside capitals it and removes spaces. Up to 50 characters. Empty on a new size gets one made for you, such as P00042. You cannot blank it later: empty keeps the current one. Another product already uses the SKU means it is taken. |
| Barcode | 8, 12, 13 or 14 digits. Spaces and dashes are ignored. Roadside checks the last digit and says That barcode's last digit doesn't check out. Type it again from the label. if it is wrong. Each barcode belongs to one size. If your plan includes Pricing check, it uses the barcode to find the same item at other stores. |
| Part number | Up to 70 characters. Pricing check uses it too. |
Sales tax class
The Sales tax list sits at the bottom of the Sizes and prices card. It names how checkout taxes the product, for every size. A standard store has Taxable and Not taxed. The sample store's list adds classes that fit Florida, such as Livestock and poultry feed, Pet and wildlife feed, Animal health (farm use) and Seed. Choose the one that describes the product. If you are unsure which class an item belongs in, ask your accountant, because Roadside does not choose for you. If a class you need is missing, write to support@dirtroadsoftware.com.
The sales tax class is the one setting in this card that waits for Save product. Choose it, then press Save product at the bottom of the screen.
Photos
A product holds up to five photos. The first is the cover: it shows in the Products list and on the website's product card. The rest show as small pictures on the product's page, in the order you set. A product with no photo shows a plain placeholder.
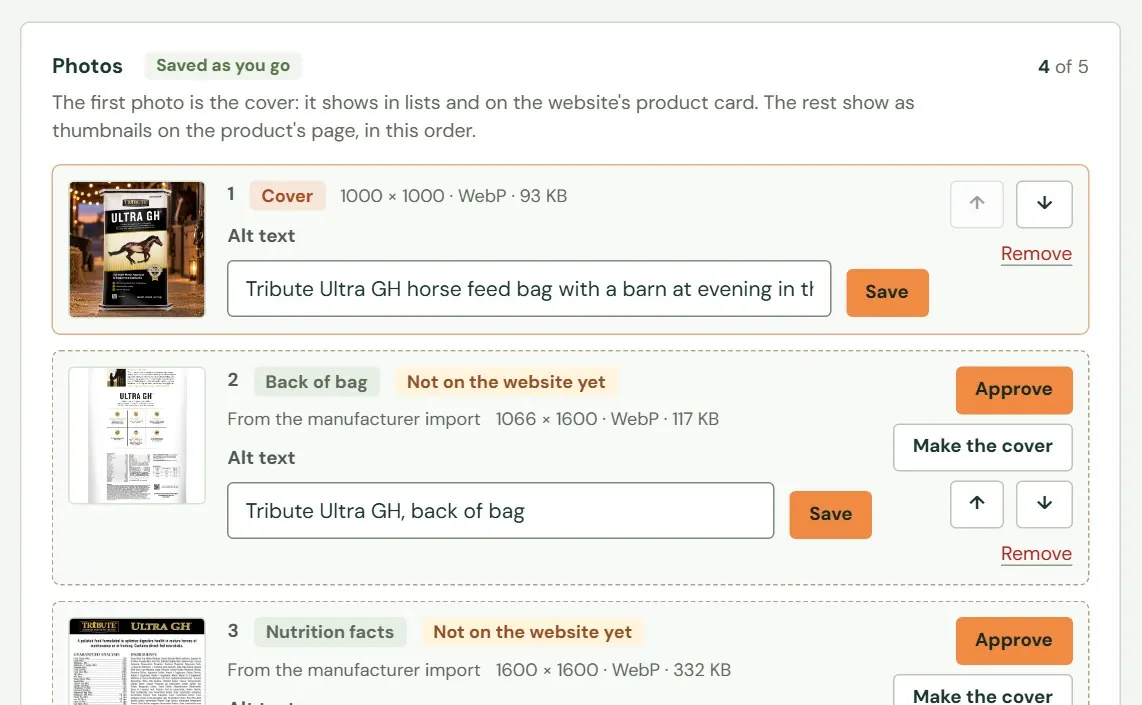 12345
12345- 1The cover, which is always the first photo.
- 2Alt text: what the photo shows, in plain words.
- 3A photo from a manufacturer file that is not on the website yet.
- 4Approve puts the photo on the website.
- 5Make the cover, move up or down, or remove.
- Alt text
- A sentence that describes a photo for people who cannot see it. A screen reader reads it aloud, and search engines read it to learn what the photo shows.
To add a photo, choose the file under Add a photo, type the alt text and press Add photo. Roadside says Photo added. The first photo you add becomes the cover. The picture must be a JPEG, PNG or WebP file under 6 MB.
On each photo's row, Make the cover moves it to the front, the arrows change its place, and Remove takes it off the product after asking. When the cover is removed, the next photo becomes the cover. Changing the alt text and pressing the row's Save says Photo saved. Every one of these buttons works at once.
Write alt text the way you would describe the picture to someone on the phone: Front of a 50 lb bag of 16% Layer Pellets. Skip photo of and image of. Alt text is shown to customers and read by search engines, so it follows the wording rules in Words that stop the website from updating, in Chapter 12.
If a photo is refused
| Roadside says | What to do |
|---|---|
| Upload a JPEG, PNG or WebP photo. | The file is another kind, or the picture is more than 8,000 pixels on a side. A phone's HEIC pictures land here. On an iPhone, set Settings, Camera, Formats to Most Compatible, or email the picture to yourself first. |
| That photo is larger than 6 MB. | Use a smaller copy. Most phones can send a medium size. |
| That photo is already on this product. | The same picture is on the product already. |
| A product has up to 5 photos. Remove one to add another. | Remove a photo you no longer need. |
Photos for one size
On a product with more than one size, each photo has a Shows for list. It starts at Every size. Choose one size and press Save to show that photo only when a customer picks that size. A grooming stool in purple, blue and black can have one photo per color. If a size is removed later, its photos go back to Every size.
Photos waiting for approval
When Dirt Road loads a maker's official photos for you, the extras arrive marked Not on the website yet, with the note From the manufacturer import. They do not show on the website, and they are never the cover in the list, until you approve them. Look at each one, then press Approve. Roadside says Photo approved. It shows on the website. A product can arrive with more than five photos. Roadside then says how many came with it, shows them all and asks you to remove some to get down to five before you add your own.
Something here does not match your screen? Write to support@dirtroadsoftware.com with the name of the screen, what you pressed and what you expected. A picture of the screen helps.